Wednesday, September 15, 2010

Kidding Part IV


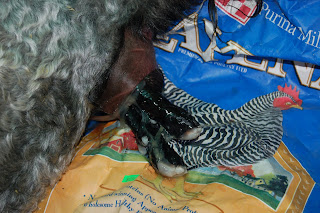
We help the does clean up their kids with old but clean towels. We weigh each kid so that we have a reference if we need to see if they are growing well. Then we clip the umbilical cord and dip it in iodine. If it is cold outside, the kids get a sweater for warmth. The kids are usually up in a few minutes looking for a drink.

Wednesday, September 8, 2010

Kidding Part III


The kid's shoulders came out easily once the legs were pulled forward. The rest of the kid was delivered quickly. Roni turned around immediately to start cleaning her baby. The kid was born with a clean face and did not need any suctioning to clear her airway.

Wednesday, June 16, 2010

Kidding Part II


Once the baby was visible, Roni was pushing hard and not making much progress, so I pulled one hoof forward to help her.

In the second picture, both legs are pulled forward to narrow the shoulders & make birth easier. The little white “booties” on the bottom of the hooves help to protect the doe's uterus from the hooves. It is very soft and will rub off as the kid begins to walk.

The grain bag provides a clean surface for the kid and helps to contain the birth fluids.

Tuesday, June 8, 2010

Kidding


Here are photos of a very normal birth, in which a small amount of assistance was provided. We use clean, empty grain bags to catch the kids and as much of the birth fluids as possible to try to keep the stalls clean.

Roni was shorn a few weeks before this kidding. Shearing prior to kidding helps with visualizing the udder to try to gauge kidding time, and makes the teats more obvious to newborn kids. Mohair ringlets can easily be mistaken for teats by newborn kids who may look like they are drinking, but not be getting colostrum.

Roni in early labor showing a vaginal discharge string and the typical “pump handle” angle of her tail that signals readiness for labor.

This kid is presented in the classic, easiest to deliver position, nose and both hooves forward (sometimes called the “diving” position). One hoof and the nose are visible here; the other hoof is hidden by the nose. The amniotic sack had already popped, making it easy to visualize the presenting parts.

Sunday, March 14, 2010

Roving


I sent some of my hand dyed fiber to Zeilinger's Mill to be processed into roving. They did a fantastic job. The roving is just wonderful. I have 3 gorgeous colorways.

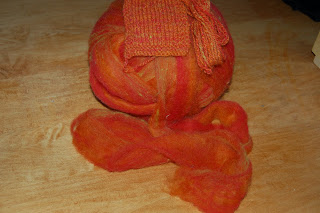
The first is called Autumn Splendor. It is a cormo and mohair blend. It is a 3 way blend of colors. First is a vibrant red, then a spicy pumpkin orange and a touch of green as well. It was inspired by the 100+ year old maples in my yard. They are an amazing blaze of color each fall.

The second is called Moonlit Garden. It is a 3 colorway inspired both by my gardens at night and by a wonderful fragrance that I use for one of my handmade soaps. It is mostly mohair with a small amount of wool added for memory. First is a rich violet/purple. Then a deep green that was overdyed on naturally colored gray mohair. Finally a soft periwinkle blue. I just love the brilliant color and luster that the high mohair content brings to this roving.

My third roving is called Toffee Temptation. This is made from fleeces that come naturally colored from the animals. The mohair is a soft yearling taupe fleece from my buck Rory. The alpaca is a chestnut red/brown. The wool is from a shetland and is a light brown fawn color. This roving is so soft, it is like a cloud. It has great shine.

These are all available from my Etsy store. They spin up nicely. I plyed a strand each of the Autumn Splendor and the Moonlit Garden and am really liking the resulting yarn.

Sunday, February 14, 2010

The Dye Pot


I've had the dye pot going a lot this month, doing lots of immersion dying. So many pretty colors to make roving, batts and yarn with.

If I am mixing different types of fiber that will all be the same color, I weigh and dye them all together. Place the lighter fibers into the pot first. Mohair usually weighs more than most fibers and also takes on color well, so I place that in last. I usually add some wool to my mohair to give some spring and memory. I like other fibers too like alpaca, angora and silk which provide softness. Mohair accepts dye wonderfully resulting in bright, vivid colors

Equipment:
Large Pot: Mine is an extra large water bath canner, the enamel coated variety.
Stirring Tool: I have a large wooden paddle.
Measuring spoons
Canning Jar: for dissolving the dye

Materials:
Clean Fleeces (I wash them except for angora bunny and alpaca)
Dye: I use Pro Chem Washfast Acid fast dyes, which require the following items:
Synthrapol: 1 tsp per pound of fiber (ppf). Used to help the fiber accept the dye
Salt: 1 Tbsp ppf. Must be non iodized, I use pickling salt.
Acid: Vinegar (2/3 cup ppf) or citric acid (1 Tbsp ppf).

Follow the instructions for the dye you are using to get the proper amount to add per pound of fiber (ppf). Experiment some with the amount if you like to see what shades you can get by using more or less dye per pound of fiber.

Weigh the dry fiber. Then soak the fiber in hot water with a 1/2 tsp of synthrapol per pound of fiber for 20 to 30 minutes.

While the fiber is soaking, I start the dye bath. In the large canning pot, I put in enough hot water to fully cover the amount fiber I will be dying. Then I add the proper amounts of synthrapol, salt, and the vinegar or citric acid. My canning jar fits over two of the burners on my stove, so I turn both of them on and heat the water to about 200 degrees.

I like to prepare the dye by pouring boiling water into a canning jar and adding the measured dye powder. Mix this very thoroughly. Add the dissolved dye to the large pot and mix the dye bath thoroughly.

The dye bath is now ready for the fiber. Squeeze water from the soaking fleece and place the fleece into the pot. I start with the lightest fiber first, placing the heaviest fiber in the pot last. Gently mix the fiber for a few minutes. I usually tend to push the fiber down into the pot with the wooden paddle, gently going from one area to another. Just don't agitate the fiber and cause felting. Keep the temperature around 200 degrees (unless you are using silk, then stay under 185 degrees) for approximately an hour. I tend to check the color of the dye bath along the way, if there is a lot of dye left in the water, more vinegar can be added, about 1/2 cup. Simmer for another 15 minutes or so.

Allow the dye bath to cool. Rinse the fiber in warm water. I like to use my washing machine (must be a top loader) to rinse and spin out the water. Then I spread the fleece out on a screen and dry it, enjoying the splendid colors.

Wednesday, January 6, 2010

Washing Fleeces


Washing Fleeces

 I find that January is a great time to get fleeces washed. It's a way to be productive inside, out of the cold weather we are having, as long as you have space for drying the fleeces inside.

 I start with a thorough skirting. I do an initial skirting of the fleeces as they are shorn, disposing of most of the undesirable parts right as they are shorn. I go through the fleeces, taking out second cuts, fiber with manure, pieces of hay, burrs, felted areas, and locks too contaminated with vegetable matter to use.

Once fully skirted, I prepare to wash the fleece. I like to use a washing machine that is dedicated to washing fleeces. I also use this process with buckets in my bathtub or in a sink. I empty each bucket slowly and gently squeeze the fiber, instead of using the spin cycle, to get the water out of the fleece. I turn my water heater up the night before I wash fleeces so that I have very hot water to work with. I find that really hot water is especially needed for wool fleeces. My mohair has much less grease and usually washes out with just one soap soak. Here are a few important tips. Never agitate the fleece in the washing machine; it will turn it into a felted mess. Always spin the water off while the water is still very warm/hot, if the water cools down too much, the grease will resettle on the fleece and not be washed out properly.

 Fill the empty washing machine with hot water. When it is finished filling, turn the machine off (very important, you do not want the machine to agitate). I add a small amount of soap for the first soak for mohair. Place the fleece into the washing machine and close the lid. I let the fleece soak for about 1.5 hours. A piece of pvc pipe left over from a plumbing project is perfect for me to use to gently gently push down on the fleece a few times during the soaks to make sure that all of it gets cleaned. Spin the water out of the fleece. This first soak gets rid of a large amount of the dirt in the fleece.

 Next I remove the fleece from the machine to avoid any felting from water falling on to the fleece as the machine fills with hot water. When the machine is full, I add the soap. A few brands that I like are Orvus paste soap and Kookaburra wool scour. Orvus is available locally and is less expensive; Kookaburra is more and has to be shipped here. I use about 1oz per pound for my mohair. All but one of my goats have minimal grease to their fleeces. Maisie, one of my white angoras has heavier grease and I use more than an ounce per pound on her fleece. For wool fleeces, I like to use 2 ounces per pound and will do 2 soap soaks as well to get rid of all of the lanolin. Make sure to turn the machine off before adding the fleece. When finished soaking (about 1.5 hrs per soak), spin the water out of the fleece.

 For rinses, remove the fleece, fill the machine, turn the machine off, and then add the fleece. Soak for about 1.5 hours and spin out very thoroughly. It usually takes 2 rinses. For the final rinse, sometimes I add some vinegar. Spin the final rinse to get as much water out of the fleece as possible. This will help decrease the drying time.

 I spread my fleeces out to dry on aluminum window screens that are on a PVC frame that my husband and son made for me. I and and turn the fleece to make sure that it dries all the way through. I have a friend that has an air hockey table that she uses. The positive airflow that it provides speeds up the drying time. I will use fans if I need to speed up drying time.

 Finally, especially with wool fleeces, check the fleeces a few weeks after they are dry. If there is still some residual lanolin, it will feel tacky to the touch. I recommend rewashing fleeces that are tacky. Most fiber mills will require another wash. I don't want to have to clean lanolin or grease off of my picker and carder or have it transfer to other fibers that I process.