Sunday, December 20, 2009

Hooves


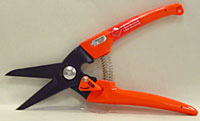
I just finished the December round of hoof trimming. Twenty one sets of feet! I use the stanchion to hold the animals and do the trimming myself. I use both the Felco brand hoof trimmers (pictured first) and the orange handled hoof trimmers (pictured second). They each bring different, needed attributes to trimming.

The popular "orange handled" trimmers are great for smaller, thinner hooves, especially good for yearlings and kids. They are light-weight, small, and easy to manipulate to trim tight areas of the hoof. I also like to use these to do the final touches on thick walled hooves. These are reasonably affordable, priced at about $20. They can be resharpened quite a few times, but don't seem to last quite as long as a set of blades for the Felco.

I like the Felco hoof trimmers for larger, thicker walled hooves. They are much easier to get the leverage needed to cut through tough hoof walls. The model I have (Felco 50) has a rotating handle. The thumb handle rotates, reducing the amount of friction and the incidence of blisters on my hands. It does take a bit of getting used to working with the rotating handle, but once mastered, it's a great tool. Felco also makes a model with regular handles (Felco 51). These trimmers are a rather expensive initial investment, $60 to $70. The company makes replacement blades and other parts, so over time the price evens out some. I find that with resharpening, these blades last longer than the orange handled trimmers. (A little hint: Premier 1 Sheep Supplies has the best price that I have seen on these trimmers.)

This fall has been very wet and muddy in areas around the barns. I discovered that some of the goats have the beginnings of interdigital dermatitis. So, trimming took a bit longer than normal as I disinfected the trimmers between each goat. This is the first time in my time as a breeder that I have encountered this. I called a few of my goat breeder friends for advice. Zinc sulfate powder was the recommendation. So I'm off to find some of this to treat their feet with. I'm hoping that with the frozen ground of winter, their feet won't be wet anymore and that having drier feet will also help clear up this problem.

Sunday, November 29, 2009

Breeding Season

Breeding Season is complete here at the farm. I decided to only breed 5 of our does this year due to the economy. I only want to have as many kids as I can handle if I am unable to find buyers. So, while breeding is finished, the rest of the does (and the bucks for that matter) don't know that so we will probably have another month of does going into heat.

For breeding, I have a temporary pen set up using electric netting for the fence and a small shelter. When a doe goes into heat, we move her and the buck of choice to the breeding pen where they will stay for a day or so. Then they are moved back to their regular areas.

I also have to put up a line of electric netting between the buck and the doe pastures. Through out most of the year, there is one fence between the 2 pastures and that is sufficient. When breeding starts, I put up the netting as a temporary second fence about 12 ft in from the permanent fence-line. This completely eliminates the destructive rubbing on the fence and breaking of the fence with horns that goes on with a single fence. It also eliminates the chance of a "through the fence" breeding as well.

I bred my 2 AAGBA white does, Moonshine and Maisie, to our wonderful AAGBA buck from Fred Speck in Texas. These are the same breedings as last fall, I am very happy with all of the kids from these breedings this spring.

Sinead is bred to Hill4115, this is another repeat breeding. Sinead's doeling, Bronwyn from this spring is outstanding. She has wonderful coverage, a nice brownish red fleece, pretty, tight curls and great luster. I'm hoping for something similar next spring.

Nessie is also bred to Hill4115. This is her first breeding. I am hoping for great things from her kids. She has a very consistent fleece with great tight curls, a pretty gray color. I love her frosted nose and ears too.

Blackie is bred to my new buck, Kai Ranch Irving (pictured at the top). Blackie has a dense, soft, medium curled fleece. She is my heaviest shearing colored goat. She is from the black/patterned (recessive) line. Irving is mixed, his sire is red from the red/black/brown line and his dam is a reverse badger from the black/patterned line. I'm hoping for some wonderful color from this breeding next spring.

Roni, Mairead, Keely, and Bo-Peep will all get this this year off and will be teasing the bucks for the next month or so as they go through their heat cycles. When the days start to get longer again, that triggers the end of breeding season for angora goats.

Tuesday, October 20, 2009

Shearing!

Shearing time has just finished here at MacGregor Hollow. It is much colder than usual this time of year and some of the goats are now sporting sweaters. It typically takes me about 40 minutes to shear, deworm and trim the feet on each goat. I also like to do an initial skirting at shearing and toss all of the felted or otherwise undesirable fleece as I go. Four goats are a typical shearing day for me, so shearing occurs over a few weeks.

When I started shearing years ago, I found that I didn't have good luck shearing the goats in the typical style with the goat on the ground. After a few ugly cuts on the goats and a big hit on my nose with the back of a goat's head (I actually saw stars!) I gave that up. So, I shear with the goats on a stanchion. My stanchion has a ramp to walk the goats up on and removable side rails. I like to place a side rail on the opposite side of where I am working to hold the goat on the stanchion. I use my Oster Showmaster shearer for the majority of each goat. I use 2 types of combs, mohair combs and 20 tooth goat combs. The Mohair combs come from Heininger. The teeth are lower in the center and flare out longer at both sides. I tend to use the Mohair combs on adults The 20 tooth goat combs are taller in the middle and taper shorter on both ends. I like these for the kids.

Starting at the middle of the topline, I make strokes down the sides of the goat from top to bottom, going under the belly as well. Then I shear down the outside of the legs. I try to be patient with the back legs, many of the goats kick out some or squat down as I try to shear the back end and I don't want to nick any of the animals. I shear the neck and chest area up to the head restraint.

For the tight areas, I like to use a set of hand-shears - old fashioned ones with red handles. This works well for inside the legs, the udder area and the head and neck around the head restraint. I like them better than scissors, I find that I'm less likely to cut the goat and they spring open automatically, saving alot of time and effort for me.

The pay-off of all this work is an amazing bounty of 23 gorgeous fleeces to have fun with. There are beautiful shades of grays, taupes and white fleeces from kid to adult. I'm so excited!!!!

Monday, September 28, 2009

Spinning

I've been spinning up a storm. I'm using fibers that come naturally colored from the animal. I have a gorgeous collection of beautiful browns. First I spun up a mix of alpaca, angora and pollworth wool. This is soooo soft, like spinning a cloud. It is just wonderful, a light off-white with sprinklings of light and medium browns. Then I chose a lovely medium brown with white flecks roving that is a mix of alpaca, shetland and angora. I did spin up a mix of merino and border leicester that is a natural brown mixed with a lime green dyed wool, very pretty. Right now, I am spinning up a medium brown shetland roving. When I'm all done, I'll have to come up with projects to make, hopefully combining these beautiful yarns.